Facebook’s Aggressive Pivot to Creator Monetization Yields Billions, Attracting New Wave of Digital Talent

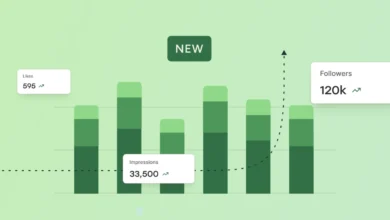
Facebook, historically perceived by many digital content creators as a platform primarily for social connection rather than robust income generation, has significantly recalibrated its strategy, emerging as a formidable player in the global creator economy. Recent data reveals a substantial commitment to financially empowering creators, with Meta-owned Facebook disbursing nearly $3 billion to content creators through its monetization programs in 2025 alone. This figure represents a remarkable 35% increase from the previous year, marking the platform’s highest annual payout to date and underscoring a strategic pivot to attract and retain digital talent amidst intense competition. The number of creators earning over $10,000 annually on Facebook also experienced a robust growth exceeding 30% year-over-year, indicating a burgeoning financial ecosystem within the platform.
Background: The Evolving Creator Economy and Meta’s Strategic Imperative
The digital landscape has witnessed an explosion in the creator economy over the past decade, driven by platforms like YouTube, Instagram, and TikTok, which have empowered individuals to build audiences and generate income through their content. For a period, Facebook’s monetization efforts lagged behind some of its rivals, leading many creators, particularly those focused on short-form video or niche content, to prioritize other platforms. This perception often positioned Facebook as a secondary channel, valuable for community engagement but less so for primary income streams.
Meta’s renewed emphasis on creator monetization is a direct response to this evolving competitive environment. The company recognizes that a thriving creator ecosystem is vital for platform engagement, user retention, and long-term advertising revenue. By offering diverse and accessible monetization avenues, Facebook aims to lure established creators from competing platforms while simultaneously nurturing emerging talent. This strategic imperative is not merely about payouts; it’s about embedding creators deeply within Facebook’s ecosystem, encouraging original content creation, and leveraging their influence to attract and retain a broader user base. The aggressive investment in creator programs signifies Meta’s commitment to making Facebook a competitive and financially rewarding home for digital content producers across various formats.
A Chronology of Facebook’s Monetization Drive
Facebook’s journey towards comprehensive creator monetization has been evolutionary, marked by significant program expansions and new initiatives:
- Early 2020s: Initial monetization efforts largely centered around in-stream ads for longer video content, limiting opportunities for creators focused on shorter formats or non-video content.
- 2025: A pivotal year for Facebook’s creator economy. The platform significantly broadened its Content Monetization program beyond traditional long-form video, extending eligibility to Reels, Stories, photos, and even text-based posts. This expansion democratized earning potential, making it accessible to a wider array of creators regardless of their primary content format. Data from 2025 indicates that Reels rapidly became the dominant earning format, accounting for approximately 60% of total creator payouts, with the remaining 40% distributed across other content types.
- March 2026: Meta launched the Creator Fast Track Program, a strategic initiative specifically designed to attract established creators from rival platforms like Instagram, TikTok, and YouTube. This program offers guaranteed monthly payments for posting Reels on Facebook, coupled with increased reach, effectively providing a powerful incentive for creators to diversify their presence and dedicate content to the platform. This program underscores Meta’s proactive approach to talent acquisition within the creator space.
- Ongoing Expansion: Throughout this period, Facebook has continuously refined its eligibility criteria, expanded geographical availability for various programs, and improved its creator tools within the Professional Dashboard and Meta Business Suite, aiming for greater transparency and ease of use.
Comprehensive Overview of Facebook’s Monetization Programs
Facebook now offers a multifaceted approach to monetization, encompassing both direct platform payouts and tools to facilitate external income generation.
1. Content Monetization Program: Ad Revenue Across Formats
The flagship Content Monetization program is an invite-only system that rewards creators based on the performance of their content. Initially limited to in-stream ads within longer videos, this program has undergone significant expansion. It now monetizes a diverse range of formats including Reels, Stories, photos, and standard text posts. This operates akin to YouTube’s ad revenue sharing, where Facebook places advertisements in and around eligible content, and creators receive a share of the revenue generated based on engagement and "qualified views." The flexibility to earn from various content types means creators are not confined to video production, allowing for a broader range of content strategies. The platform emphasizes that "qualified views" are central to earnings, generally requiring unique views of a certain duration (e.g., approximately 5 seconds for shorter formats) to count towards monetization.
2. The Creator Fast Track Program: Incentivizing Established Talent
Launched in March 2026, the Creator Fast Track program is a targeted initiative aimed at drawing established creators to Facebook. It offers guaranteed monthly payments for creators who commit to posting a minimum number of eligible Reels (15 Reels across at least 10 separate days) on Facebook. Eligibility is tied to follower counts on other major platforms (Instagram, TikTok, or YouTube), with tiers of guaranteed pay corresponding to these external audience sizes. For instance, creators with 20K-49K followers on a qualifying external platform might receive a base payout, while those with 50K-99K, 100K-499K, and 500K+ followers receive progressively higher guarantees. A significant advantage is the allowance for cross-posting existing content, provided it’s original and hasn’t been previously published on Facebook. Beyond guaranteed pay, participants also benefit from increased algorithmic reach for their eligible Reels and immediate access to the broader Content Monetization program, ensuring continued earnings even after the Fast Track period concludes. This program is currently restricted to creators in the US and Canada, highlighting a strategic focus on specific markets.
3. Facebook Stars: Direct Fan Support
Stars function as Facebook’s virtual tipping mechanism, allowing viewers to purchase and send Stars to creators during live streams, on Reels, and other content. Each Star is valued at $0.01 USD. While individual Star contributions may seem small, they provide an accessible and direct avenue for fan support, particularly for creators with engaged, if not massive, audiences. The eligibility threshold for Stars is relatively low, requiring just 500 followers for 30 consecutive days, making it the most accessible native monetization option for emerging creators. It is particularly effective for interactive content formats like Q&As, tutorials, or behind-the-scenes streams, where audience connection fosters a greater likelihood of direct financial appreciation.
4. Fan Subscriptions: Building Recurring Revenue Streams
Fan Subscriptions enable creators to offer exclusive content behind a paywall for a recurring monthly fee. This model mirrors membership platforms like Patreon, allowing creators to cultivate a dedicated community of "superfans." Subscribers typically gain access to perks such as exclusive posts, early content access, subscriber-only live sessions, or special badges. This offers creators a more predictable and stable income stream compared to volatile ad revenues. However, the eligibility requirements are significantly steeper, demanding at least 10,000 followers (or 250+ return viewers) along with robust recent engagement (e.g., 50,000 post engagements or 180,000 watch minutes in the last 60 days). Subscriptions are exclusively available for Facebook Pages, not professional mode profiles, indicating a preference for established brand presences. Creators are advised to carefully price their subscriptions to reflect the value offered, aligning with market rates within their niche.
Beyond Native Monetization: Diversifying Income Streams on Facebook
In addition to its native programs, Facebook provides robust tools and an environment conducive to several external monetization strategies.

5. Brand Partnerships and Sponsored Content
Brand partnerships represent a significant income stream for creators across all audience sizes, including nano-creators with fewer than 10,000 followers. Brands collaborate with creators to promote products or services to their specific audience. Facebook facilitates this by offering a "Paid partnership with [Brand Name]" label, which creators can apply to their posts, Reels, and Stories. This label ensures transparency with the audience and allows brands to amplify sponsored content through paid boosts. Creators can secure brand deals through direct outreach, being approached by brands, or leveraging creator marketplaces like Collabstr, Passionfroot, or Aspire.io, which connect brands with suitable influencers. The key to successful brand partnerships lies in audience relevance and authentic alignment with the brand’s values.
6. Establishing a Facebook Shop: Direct-to-Consumer Sales
For creators or small businesses with physical or digital products, a Facebook Shop offers an integrated e-commerce solution. This feature allows users to browse and purchase products directly within the Facebook app, eliminating the need to navigate to an external website. Creators can tag products directly in their posts, Reels, and Stories, transforming their content into shoppable experiences. This integration creates a powerful synergy, where engaging content can drive direct sales, complementing ad revenue or other monetization methods. Eligibility for Facebook Shops typically requires compliance with Meta’s Commerce Policies, an existing online store or product catalog, and a verifiable, established presence on the platform.
7. Affiliate Marketing: Commission-Based Earnings
Affiliate marketing involves promoting products or services using unique referral links, earning a commission on every sale generated through those links. Commission rates typically range from 5% to 25%, varying by product and program. Creators can join affiliate programs relevant to their niche and seamlessly integrate referral links into their Facebook posts, video descriptions, and Stories. Transparency is crucial, with legal requirements in many regions mandating disclosure of affiliate relationships. Facebook is also developing its native Affiliate Partnerships program, which allows creators to tag shoppable products directly within posts and Reels and earn commissions on qualifying purchases. This program is currently available with major retailers like Amazon (US), Shopee (various Asian and Latin American markets), and Mercado Libre (Brazil, Mexico), with further expansions, including eBay and Temu in the US, anticipated.
Navigating Eligibility and Compliance
To access Facebook’s monetization programs, creators must meet specific criteria, which vary by tool but share common foundational requirements:
- Profile/Page Type: Creators generally need either a professional mode profile or a dedicated Facebook Page. Professional mode allows personal profiles to access creator tools and monetization features without losing existing friends or content, though it defaults the profile to public. Facebook Pages are typically required for more advanced features like Fan Subscriptions.
- Policy Compliance: Strict adherence to Meta’s Partner Monetization Policies and Community Standards is non-negotiable. These policies govern content suitability, authenticity, intellectual property rights, and user safety. Violations can lead to demonetization or platform suspension.
- Age and Location: Creators must be at least 18 years old and reside in an eligible country for the specific monetization feature. While many programs are broadly available, some, like the Creator Fast Track, have stricter geographical limitations (e.g., US and Canada only).
- Performance Metrics: Specific programs have distinct follower counts, engagement thresholds, or view minute requirements. For instance, Stars require 500 followers for 30 consecutive days, while Fan Subscriptions demand 10,000 followers or 250+ return viewers, alongside significant engagement metrics. The Content Monetization program’s exact public threshold for invitations is dynamic, but consistent posting and high engagement are key factors.
Creators can monitor their eligibility status and potential invitations through their Professional Dashboard (for profiles) or Meta Business Suite (for pages), where they can also opt for notifications when they qualify for new programs.
Payout Procedures and Financial Logistics
Once creators begin earning, setting up a payout account is a straightforward process. Facebook typically processes payments monthly, usually between the 17th and 22nd of each month, for earnings accrued in the prior month. There are two primary payout thresholds: $25 for some features and $100 for others. Payment options generally include direct bank transfer and PayPal, though availability may vary by country.
To configure payout information, creators navigate to the Monetization settings within their Professional Dashboard and follow prompts to link their bank account or preferred payment method. It is mandatory for creators to provide up-to-date tax information, as Facebook requires this before initiating any payments, ensuring compliance with international financial regulations. International creators should particularly note that payout availability and methods can differ significantly by region, necessitating a check of Facebook’s official help center for country-specific eligibility and payout details.
Strategies for Maximizing Reach and Earnings
Monetization is merely the initial step; sustainable growth in earnings requires a strategic approach to content creation and audience engagement:
- Consistency Across Formats: Facebook’s algorithm favors creators who consistently publish content. With Content Monetization now covering Reels, photos, text posts, and Stories, creators have the flexibility to maintain a diverse and regular posting schedule without being confined to a single format. Leveraging tools for scheduling and cross-posting can significantly streamline this process.
- Prioritize Original Content: Facebook is actively emphasizing and rewarding original content, while simultaneously cracking down on reposted or spammy material. Original content not only qualifies for higher monetization rates but also tends to receive greater algorithmic distribution, leading to more qualified views and increased earnings.
- Understand the Facebook Algorithm: Familiarity with how the Facebook algorithm works is crucial for maximizing content visibility. Factors like engagement (likes, comments, shares), watch time for videos, and timely interaction with trending topics can significantly impact reach and, consequently, monetization potential. Analyzing performance metrics in the Professional Dashboard helps identify what content resonates most with the audience.
- Leverage Cross-Posting (Strategically): While original content is prioritized, strategic cross-posting from other platforms (especially for the Creator Fast Track program) can efficiently expand a creator’s presence and earnings on Facebook without doubling the workload. Tools like Buffer can facilitate seamless content distribution across multiple social media channels.
Broader Implications and Future Trajectory
Facebook’s aggressive re-entry into the creator economy has significant implications. For Meta, it represents a critical strategy to diversify its revenue streams beyond traditional advertising, strengthen its competitive stance against rivals like TikTok and YouTube, and cultivate a more vibrant, creator-centric ecosystem. By empowering creators, Facebook aims to increase user engagement, attract younger demographics, and solidify its position as a central hub for digital content consumption.
For creators, this pivot presents a substantial new opportunity. Many who had previously dismissed Facebook for income generation are now reconsidering its potential. The expansion of monetization options, particularly for non-video content and smaller creators, democratizes access to earning potential. The Creator Fast Track program, in particular, offers a clear financial incentive for established talent to integrate Facebook into their multi-platform strategy.
The long-term success of this strategy will depend on Meta’s continued investment, transparency in its monetization policies, and its ability to maintain a fair and sustainable revenue-sharing model. As the creator economy continues to mature, platforms that offer diverse, accessible, and lucrative monetization avenues will ultimately attract and retain the most influential digital talent, shaping the future landscape of online content creation and consumption. Facebook’s current trajectory suggests it is firmly committed to being at the forefront of this evolution.


